4 Steps To Show or Hide Labels in Your Gmail Account
Labels are a key feature in Gmail. Even though they are “labels“, they are more or less “Folders” that Google gives users absolute control over how to manage their incoming mails.
With Labels, users are able to direct specific emails to certain folders. Personally, I do create labels to identify mails that are urgent to attend and those that are not (probably not all that important).
In this guide, you will be able to show or hide Labels in your Gmail Account. Kindly read this article to the very end for more information.
Read Also: How to Add a Phone Number to Your Gmail Account In 12 Simple Steps
Show or Hide Labels in Your Gmail Account
Before you can proceed, you need to log into your Google account. Below are the steps on how to show or hide Labels in your Gmail account:
1. Login into your Gmail account
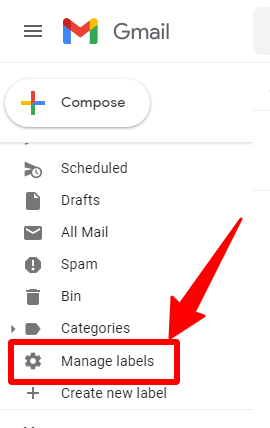
2. On the left Menu panel, locate and click on “Manage Labels“.

Read Also: How To Enable Gmail 2-Step Verification On Android Phones And Tablets
3. Now, you can modify the Labels tab by selecting which session to show or hide. See the image below:
4. You are finally done. That is how easy to show or hide Labels in your Gmail Account.
Read Also: The Easiest Way To Download And Install Steam On Windows PC
In conclusion, these are the steps on how to show or hide Labels in your Gmail Account. If you find this article, kindly share. You may want to let us know if you faced any technical challenges in the comment section below.

